Last week, I built the first full shoe with rubber on Dan's scaled last. This shoe also pioneered the first CAD patterns: after modelling the fabric on the computer, I used software to generate flat patterns from the 3D form, printed out the patterns, and sewed a shoe from them. It took a couple of hours to optimize the patterns, since the inputs for algorithm that flattens the surface have to be tuned to minimize distortion.
 This means looking at a curvature plot of the surface to identify high curvature regions (which correspond to areas where the fabric would need to stretch a great deal), and then tweaking relief cuts on the surface to decrease the maximum stretch the fabric experiences. Patterns that equate to less stretch in the real world can be flattened by the software with the fewest errors and distortion.
Once I had hacked together a file with mostly optimized patterns, I started all over in a new file. Why? In honor of two talented engineers at my previous job, I wanted to create a parametric pattern file. Also because this will save me effort and time when building shoes to order in arbitrary sizes: a parametric model means that all the patterns should automatically update if I change the last scale.
In order to do that, the CAD file has to be structured very carefully, so I wanted to start from a blank slate with no distractions. I'd done all of the steps to create the patterns in the hacky file, but they were out of order. This gave me a clear idea of how to get from a last to a pattern; I just had to put all the steps in an order such that changing the scale (a step in the middle) wouldn't break any steps that came after it. This can be fairly simple if you use some best practices, like only using universal references (references that rarely have to be changed, and are usually some of the first five steps in a model). However, a last is a completely organic shape with basically no obvious references.
However, due to a quirk of 3D modelling, the ends of my lasts each have a small flat surface. CAD programs have difficulties computing models that have singularities - places where all the nodes of a surface converge on a point, like the pole of a sphere - so it's best to model a small area around these poles as flat, in my case - like the top of a hot air balloon.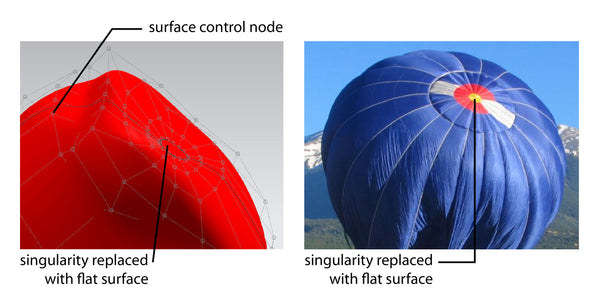
Since these flat surfaces already exist in my last model, I created universal references on them. Now, all my sketches refer to those origin points, so when the references move, the sketches that generate the patterns move accordingly.
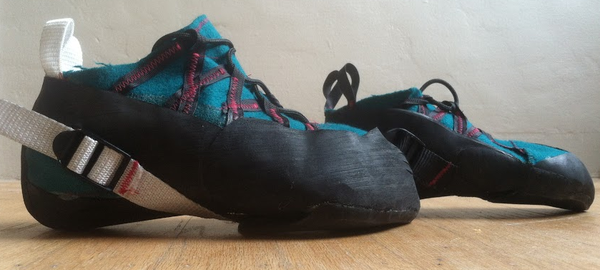
With this parametric model, creating Dan's shoe patterns was a matter of changing 3 scale constants and printing the patterns. The first prototype built this way had some problems with its rubber patterns (which are not yet in CAD), so I tore off its sole and modified it yesterday. Dan tried it and thought that the new sole offered better range of motion and fewer pressure points, but the lacing system over the tongue has to be redone. Since the lacing runs under the rand rubber, I'll have to build a new shoe. My goal is to finish the new shoe, incorporating all design modifications, by tomorrow at 7 pm, when we're going climbing with friends.
]]>